Account Creation by Import
Only the super administrator or a school administrator can access the file import feature.
New accounts can be created by uploading the required information in an Excel or CSV file.
If you want to update existing accounts this way, please refer to the Account Update by Import section.
Excel and CSV Templates
Download the Excel and CSV templates here or by clicking the link under the Import tab.
Note—When preparing import files, you may change the column order but not the column headings. The system will not recognize the data contained in cells under a heading that has been changed.
Creating an Import File for Student Accounts and Associated Groups
Student accounts can be created and assigned to groups in bulk by uploading a file with data organized appropriately under the following eight column headings:

Example
- Student ID (optional)—This field must only contain alphanumeric characters if used. It provides the option of associating student Typing Pal accounts with a unique identifier used by the school’s internal management system.
- Student’s first name—This field must only contain alphanumeric characters.
- Student’s last name—This field must only contain alphanumeric characters.
- Username—This field must contain between 3 and 20 alphanumeric characters. Usernames attributed to accounts in the same school must be unique.
- Password—This field must contain between 5 and 20 characters; only alphanumeric characters and the special characters -_.!@#$%?&*():; are accepted. It provides the option of having students log in using predefined passwords. This information is overwritten by a temporary password when you download students’ login information.
- Email (optional)—This field must contain a valid email address if used. The information serves only to recover a forgotten password or for manually sharing login information.
- Group—This field must only contain alphanumeric characters; this entry will typically correspond to the name of the student’s class. If a group name does not yet exist in the system, a new group will be created.
- Custom subdomain—This field must contain the subdomain of the school’s custom URL. For example, myschool is the subdomain of the following URL: http://myschool.typingpal.com. This column is only processed if the file is imported at the Subscription management level. File templates downloaded from the School level Import tab will not include this column.
Groups created by import at the same time as user accounts will only be assigned to the accounts listed in the uploaded file. This means:
- You must assign students to their groups in a separate step if both are not created at the same time.
- If you create new groups at the same time as student accounts, you must assign teachers to them in a separate step.
Note—You cannot create student and teacher accounts together.
Creating an Import File for Teacher Accounts and Associated Groups
Teacher accounts can be created and assigned to groups in bulk by uploading a file with data organized appropriately under the following seven column headings:
Example
- Teacher’s first name—This field must only contain alphanumeric characters.
- Teacher’s last name—This field must only contain alphanumeric characters.
- Username—This field must contain between 3 and 20 alphanumeric characters. Usernames attributed to accounts in the same school must be unique.
- Password—This field must contain between 5 and 20 characters; only alphanumeric characters and the special characters -_.!@#$%?&*():; are accepted. This information can be used to access a newly created or updated teacher account. It is automatically overwritten when the account holder resets their password after they are sent their login information.
- Email—This field must contain a valid email address.
- Group—This field must only contain alphanumeric characters; entries will typically correspond to the names of the teacher’s classes. If a teacher is responsible for several groups, repeat the information on multiple lines, changing only the group name (as shown in the example above). If a group name does not yet exist in the system, a new group will be created.
- Custom subdomain—This field must contain the subdomain of the school’s custom URL. For example, myschool is the subdomain of the following URL: http://myschool.typingpal.com. This column is only processed if the file is imported at the Subscription management level. File templates downloaded from the School level Import tab will not include this column.
Groups created by import at the same time as user accounts will only be assigned to the accounts listed in the uploaded file. This means:
- You must assign teachers to their groups in a separate step if both are not created at the same time.
- If you created groups separately without teachers, you must assign their accounts to those groups after the fact.
Creating an Import File for School Administrator Accounts
School administrator accounts can be created and assigned to schools in bulk by uploading a file with data organized appropriately under the following seven column headings:

Example
- Administrator’s first name—This field must only contain alphanumeric characters.
- Administrator’s last name—This field must only contain alphanumeric characters.
- Username—This field must contain between 3 and 20 alphanumeric characters. Usernames attributed to accounts within the same school must be unique.
- Password—This field must contain between 5 and 20 characters; only alphanumeric characters and the special characters -_.!@#$%?&*():; are accepted. This information can be used to access a newly created or updated school administrator account. It is automatically overwritten when the account holder resets their password after they are sent their login information.
- Email—This field must contain a valid email address.
- Phone Number—This field must contain a phone number in any standard format.
- Custom subdomain—This field must contain the subdomain of the school’s custom URL. For example, myschool is the subdomain of the following URL: http://myschool.typingpal.com. This column is only processed if the file is imported at the Subscription management level. File templates downloaded from the school Import tab will not include this column.
Creating an Import File for Schools
If the subscription covers multiple schools, the super administrator will be able to add schools using the file import feature. Otherwise, the option and associated file template will be hidden.
Schools and associated school administrator accounts can be created in bulk by uploading a file with data organized appropriately under the following three column headings:
Example
- School name—This field must only contain alphanumeric characters.
- Custom subdomain—This field must contain the subdomain of the school’s custom URL. For example, myschool is the subdomain of the following URL: http://myschool.typingpal.com.
- Signup code—This field must only contain alphanumeric characters. This code can be used by the students to register themselves and create their own accounts.
Importing a File
Once your import file has been prepared according to the criteria described above, follow the steps below to upload your data:
- Click the Import tab, choose the type of data you want to upload (Schools, Teachers or Students) from the drop-down menu under Import Data and click Select a file. Alternatively, you can click the tab that corresponds to the data type, select Import from the More menu, then click Select a file.
- Select the file you prepared for upload.
- Validate the import in the File preview window, then click Process the data and wait for the confirmation. The system will check the data before it is processed, and you will be alerted to any issues and provided a copy of the spreadsheet indicating the specific information that needs to be fixed.
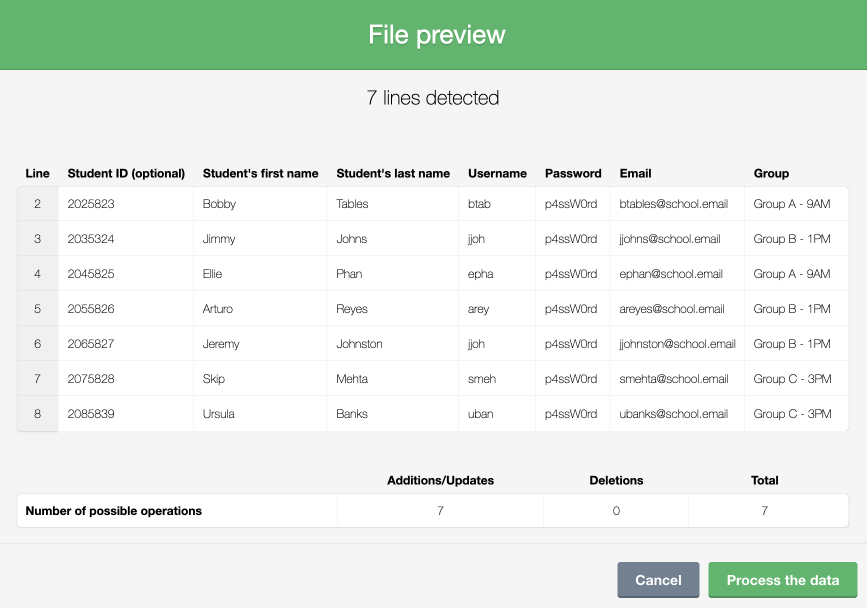
Preview of the uploaded file’s contents
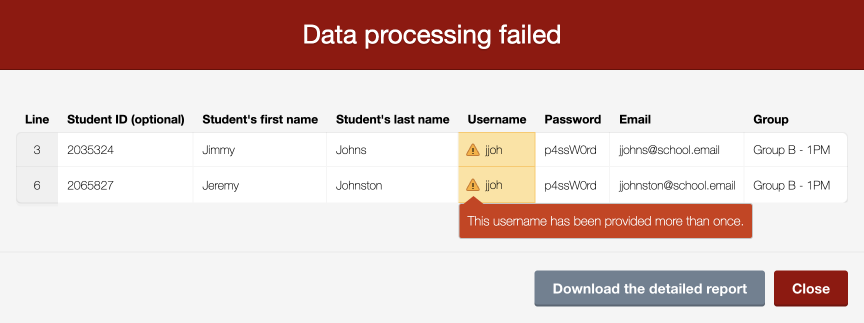
Error message indicating a problem with the upload