Getting Started With Typing Pal — School Edition: Setting Up as an Administrator
School Edition
Typing Pal’s School Edition provides a simple, effective and fun way to teach how to type. The training activities and management interface are tailor-made for schools. There are many ways to adapt the educational program and customize your students’ experience. But with such a wealth of management options, those new to the program may feel a bit overwhelmed at first. Not to worry! This series of articles shows you the first steps you need to take to set up Typing Pal.
SERIES — Getting Started With Typing Pal — School Edition
You should have received an email from Typing Pal confirming your access and inviting you to select a new password. After completing this step, you will get to Typing Pal’s management interface. To log in again, use your school’s custom URL (for example, https://mapleridgeschool.typingpal.com) or the link for super administrators included in the email. > Learn more about how you can log in.
The steps for setting up Typing Pal depend on your situation. Which one applies to you?
Go to the Schools tab, then click the school whose settings you want to configure.
In the School Summary, click the Edit buttons to configure basic settings (such as login options and the default keyboard), teacher account permissions (if you want to restrict what this school’s teachers can manage) and the location (handy if users lose their login page URL and need to use the search tool).
Now, shape up your schools by adding teachers and groups!
Adding Groups and Teacher Accounts
Before you can create student accounts, you must add at least one group and assign a teacher to it. You can do this in two ways: one at a time or multiple at once.
Creating a Group and Its Assigned Teacher Account
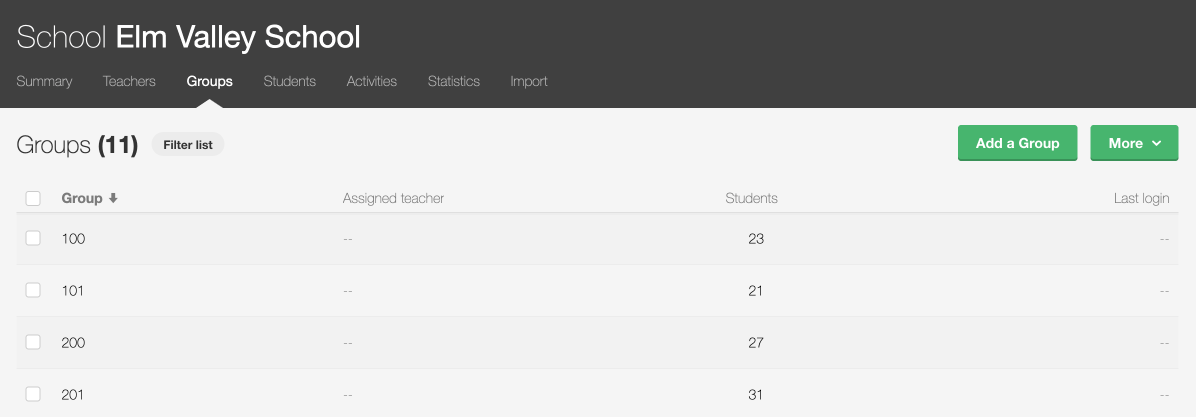
Go to the Groups tab.
Click the Add a Group button.
1
2
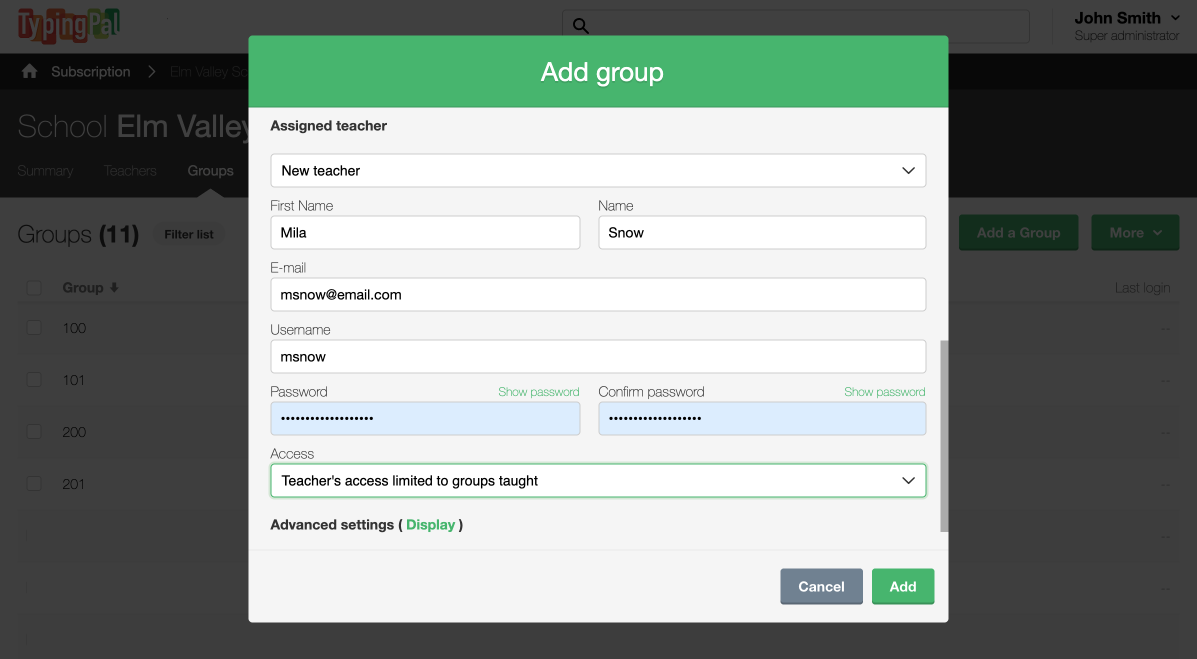
Fill in the required fields in the new window. In the Assigned teacher section, select New teacher and enter their information to create an account.
Click Add.
3
4
Creating Groups and Teacher Accounts by File Import
If you need to create multiple groups and teacher accounts, follow the file import procedure from the User Guide.
With this option, start by downloading the templates. Open and fill out the one named “TP-model_teacher”. If a teacher is responsible for several groups, create a separate line for each group.
Check out the Group Management chapter in the User Guide to learn more. You can even assign more than one teacher to a group.
But what is a school without students? Your next step is creating their accounts.
Adding Student Accounts
Your students are probably excited to start their Typing Pal adventure! You just need to create their accounts. There are three ways to do so.
Self-Registration
Save valuable time by asking students to create their own account. Provide them with their school’s custom URL and signup code. Students can then create their account by entering their name, choosing their username and password, and selecting their teacher and group.
File Import
You can create student accounts by file import just like for groups and teacher accounts. Create student accounts and assign them to groups in a single step by uploading a file.
With this option, start by downloading the templates. Open and fill out the one named “TP-model_student”. If you enter a group that does not yet exist, it will be created when you import the file.
If you only need to add a handful of students, you can create their accounts manually.
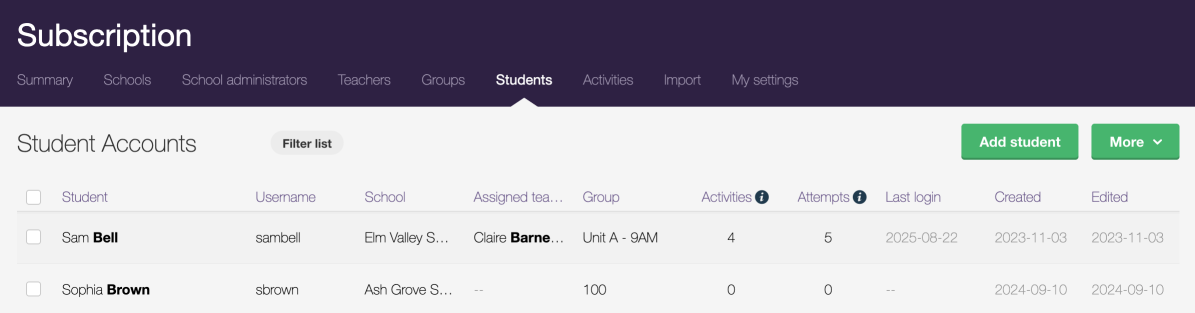
Go to the Students tab.
Click the Add student button.
1
2
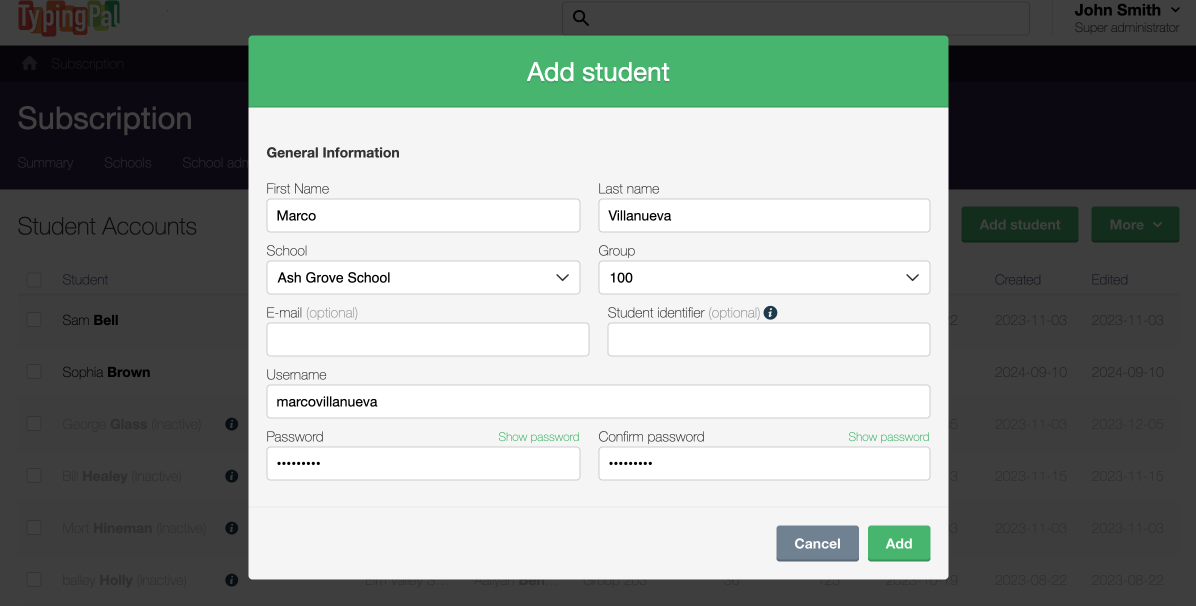
Fill in the required fields in the new window. • You must choose each student’s username and password. • The student identifier is optional but can be useful to link the account to the identifier used in your school’s management system.
Click Add.
3
4
Check out the Student Management chapter in the User Guide to learn more.
Congratulations! You have created all the accounts needed to use Typing Pal in class. Spread the news by providing everyone with their login information.
Sharing Login Information
Now that your account structure is in place, send the people with Typing Pal accounts their login information.
Sending Login Information to School Administrators and Teachers
There is no option for sending students their login information automatically, since they do not need an email to have a Typing Pal account. You must provide it to them directly.
First, invite your students to go to Typing Pal’s login page using the school’s custom URL. Then, select the option that applies to you.
If you opted for self-registration:
Students already know their username and password, as they chose them themselves (rewatch the video).
If you created accounts by file import: Provide each student with the username and password you entered in the import file. OR Download an Excel or CSV file with the usernames and new temporary passwords generated by Typing Pal (passwords currently in use cannot be downloaded for security reasons). Then, provide each student with their username and temporary password.
If you created accounts manually: Provide each student with the username and password you chose when creating their account. OR Download an Excel or CSV file with the usernames and new temporary passwords generated by Typing Pal (current passwords cannot be downloaded for security reasons). Then, provide each student with their username and temporary password.
If you used temporary passwords, the system will prompt students to choose a new password once they log in.
🎉 That’s it! Teachers and students can now log in to their account, customize their settings and start exploring Typing Pal.
We hope you found this walkthrough useful. We have only covered the basics of setting up Typing Pal, so check out the User Guide to learn more.
With training activities and features developed specifically for educational organizations, Typing Pal’s School Edition is the ultimate tool for teaching touch typing. It offers such a wealth of management options that those new to the program may feel a bit overwhelmed at first. Not to worry! This three-article series aims to help you familiarize yourself with Typing Pal’s management interface so you can get the system set up and ready to use with your students.
SERIES — Getting Started With Typing Pal — School Edition
This article is aimed at school staff who hold one of Typing Pal’s two administrator roles: the superadministrator and the school administrator.
Super administrator
The super administrator is the highest-level user in Typing Pal’s management structure. They enjoy all the management privileges for a subscription and can configure settings for one or more schools. They can also create groups and all other account types, typically through the Subscription level of the management interface.
School administrator
A school administrator has virtually all the same management privileges as the super administrator. However, these privileges are restricted to the school for which the account was created and are managed through the School level of the management interface.
How to Get Started
The first steps you take when getting started with Typing Pal — School Edition depend on your particular situation.
Are you a teacher trialing Typing Pal with your class? With a trial subscription, you are automatically assigned the super administrator role, regardless of your real-life role in education. You can start Adding Teachers and Groups right away.
Have you been invited to manage Typing Pal for your school? You have been assigned the school administrator role, and you’ll want to start by Configuring School-Level Settings.
Click the Schools tab in the Subscription Summary, then click the name of the school for which you want to manage settings.
Once you’re on the School Summary screen, you can customize certain school settings like the default keyboard, the login options for single sign-on and the school’s location.
Teacher account permissions are also defined at the school level. You can choose to retain the default settings or to revoke one or more of these privileges for all teacher accounts assigned to the school.
But what use are empty schools? Keep reading to learn how to populate them!
Adding Teachers and Groups
Before anyone can start using Typing Pal in class, you’ll need to add at least one group and assign a teacher to it. Teacher accounts manage groups of students and are required to create student accounts.
You can add teachers to a school in multiple ways: add them individually by following the manual procedure or add them when you create their groups. A teacher account will be created at the same time as the group and will be automatically assigned to it. Simply select New teacher from the drop-down menu under Assigned Teacher and fill in the required fields before adding the group.
Alternatively, you can upload account data to add teachers en masse by following the file import procedure. When you’re dealing with a lot of accounts, it’s much more efficient to import the information. This method also lets you create teacher accounts and assign them to their corresponding groups simultaneously. You can edit a group after creating it to add additional teachers, as needed.
Note—When adding teachers by file import, you need to take into account certain factors that underlie the way they are assigned to their groups. Read the documentation on account creation by import to learn more.
Now that your educators are ready to go, you can enroll your students!
Adding Students
Your students are probably eager to get acquainted with Typing Pal! All you have left to do is to create their accounts or to invite them to self-register. You can add students to a school in three different ways:
Self-Registration
You can give students the option of creating their own account when they first log in. Simply provide them with the school’s signup code and custom URL. Delegating this step to the students themselves will save you the most time and effort. Keep in mind, you must first create all associated groups and teacher accounts.
File Import
As with teachers, you can add students by following the file import procedure. Importing student data is another huge time saver; it lets you create the accounts and assign them to their groups in a single step. If a group name listed in the import file doesn’t already exist for the school in question, that group will be created and the corresponding students assigned to it automatically.
Note—When adding students by file import, you need to take into account certain factors that underlie the way they are assigned to their groups. Read the documentation on account creation by import to learn more.
Manually
If you only need to add a handful of students, you can create their accounts and assign them to their groups by following the manual procedure.
Congratulations, your account structure is now in place! The only step left is to let your users connect.
Sharing Login Information
Now that you’ve got Typing Pal — School Edition set up and ready to go, your users just need access to their accounts to get started.
Sending Login Information to School Administrators
If you’re the super administrator of a subscription, you can delegate management to local school administrators by sending them their login information automatically through Typing Pal’s management interface.
Sending Login Information to Teachers
If you’re the super administrator or a school administrator, you can send login information to teachers through Typing Pal’s management interface in the same way.
Providing Login Information to Students
There’s no option for sending automated emails to students; since children may not have an email account, an email address isn’t required and may not even exist in the system. This means that you’ll need to provide them with their login information yourself before they can begin their training.
First, invite them to visit Typing Pal’s login page at the school’s custom URL, then:
If you chose to let students create their accounts by self-registration: Send them the school’s signup code. They will be asked to provide a username and password to create their account.
If you created student accounts by file import: Provide them with the username and password you defined for their account in the import file OR Download a spreadsheet of login information containing usernames and automatically generated temporary passwords, and send each student the username and password associated with their account in that file.
If you created student accounts manually: Download a spreadsheet of login information containing usernames and automatically generated temporary passwords, and send each student the username and password associated with their account in that file.
If the login information you send to students includes temporary passwords, the system will prompt them to choose a new one when they log in for the first time.
All done! Your users can now connect to their accounts, customize their settings and start exploring Typing Pal — School Edition.
We hope you found this walkthrough helpful! Although we’ve only touched on the basics of system setup here, you can find additional details about the different settings and options in our User Guide.
If you’re new to teaching with Typing Pal, read the final article in this series for tips on customizing the experience, managing training activities and reviewing your students’ results.